Shaw Luxury Vinyl Residential Resilient Direct Glue Installation Guide
Click here to download this information guide, and click here to browse our Shaw Floorté Products.
INSTALLATION GUIDELINES FOR RESIDENTIAL RESILIENT DIRECT GLUE
1. TEST BEFORE STARTING INSTALLATION
Note: All substrates to receive moisture sensitive floor covering must be tested for moisture.
CONCRETE SUBSTRATES
All concrete substrates should be tested for IRH (Internal Relative Humidity) according to ASTM F 2170.
Calcium Chloride tests may be conducted in addition to IRH and must be performed per the latest edition of ASTM F 1869.
NEW AND EXISTING CONCRETE SUBFLOORS SHOULD MEET THE GUIDELINES OF THE LATEST EDITION OF ACI 302 AND ASTM F 710, “STANDARD PRACTICE FOR PREPARING CONCRETE FLOORS TO RECEIVE RESILIENT FLOORING” AVAILABLE FROM THE AMERICAN SOCIETY FOR TESTING AND MATERIALS, 100 BARR HARBOR DRIVE, WEST CONSHOHOCKEN, PA 19428; 610‐832‐9585; HTTP://WWW.ASTM.ORG.
- Substrates shall be smooth, structurally sound, permanently dry, clean and free of all foreign material such as dust, wax, solvents, paint, grease, oils, old adhesive residue, curing and hardening/ curing compounds, sealers and other foreign material that might prevent adhesive bond.
- If the adhesive residue is asphalt‐based (cut‐back), or any other type of adhesive is present, it must be removed by industry accepted methods such as mechanical removal or wet scraping.
- If a chemical abatement has been performed, use Shaw Surface Prep EXT to remove any residual chemicals present. Once Shaw Surface Prep EXT has been properly cleaned and removed, apply one coat of Shaw MRP for additional protection.
WARNING! DO NOT SAND, DRY SWEEP, DRY SCRAPE, DRILL, SAW, BEAD BLAST ORMECHANICALLY CHIP OR PULVERISE EXISTING RESILIENT FLOORING, BACKING, LINING FELT , ASPHALTIC “ CUT BACK” ADHESIVES OR OTHER ADHESIVES.
These products may contain either asbestos fibers and/or crystalline silica. Avoid creating dust. Inhalation of such dust is a cancer and respiratory tract hazard. Smoking by individuals exposed to asbestos fibers greatly increases the risk of serious bodily harm. Unless positively certain that the product is a non‐asbestos‐containing material, you must presume it contains asbestos. Regulations may require that the material be tested to determine asbestos content and may govern the removal and disposal of material. See current edition of the Resilient Floor Covering Institute (RFCI) publication Recommended Work Practices for Removal of Resilient Floor Coverings for detailed information and instructions on removing all resilient covering structures. For current information go to www.rfci.com.
- Concrete floors shall be flat and smooth within 1/8" in 6 feet or 3/16” in 10 feet.
- F‐Number System: Overall values of FF 36/ FL 20 may be appropriate for resilient floor coverings.
- Moisture Vapor Emission Rate (MVER) – Conduct either in‐situ RH test (ASTM F‐2170) or CaCl MVER test method (ASTM F1869) Refer to the adhesive information for the acceptable moisture limits.
- Use cementitious patching and leveling compounds that meet or exceed Shaw’s maximum moisture level and pH requirements. Use of gypsum‐based patching and/or leveling compounds which contain Portland or high alumina cement and meet or exceed the compressive strength of 3,000 psi are acceptable.
- Perform Bond testing to determine compatibility of adhesive to the substrate. Shaw 9050 primer can be utilized to promote adhesion.
- Porosity – water drop test will help determine porosity – if drop remains on the surface after 1‐2 mins concrete should be considered non‐porous.
- Working and open times of adhesives may vary based on job conditions, substrate, temperature, and humidity.
- Areas to receive flooring should be adequately lighted during all phases of the installation process.
- It is recommended that resilient floor covering installation shall not begin until all other trades have completed.
TEMPERATURE ‐ AMBIENT
Controlled environments are critical. Fully functional HVAC systems are the best way to ensure temperature and humidity control.
- DO NOT install resilient flooring products until the work area can be temperature controlled.
- The permanent HVAC system turned on and set to a minimum of 65°F (18.3°C) or a maximum of 85°F, for a minimum of 7 days prior to, during, and after installation. Once the installation is complete the temperature should not exceed 85°F (29.4°C).
PH
Concrete floors must be tested per the latest edition of ASTM F 710.
- PH reading must not exceed 10.0.
- Readings below 7.0 and in excess of 10.0 affect resilient flooring and adhesives negatively.
- Rinsing the surface with clear water may lower alkalinity. “DAMP MOP”
- Shaw 9050 an acrylic solution can be utilized to correct high PH readings.
NOTE: IT MAY NOT BE THE FLOOR COVERING INSTALLER’S RESPONSIBILITY TO CONDUCT THESE TESTS. IT IS, HOWEVER, THE FLOOR COVERING INSTALLER’S RESPONSIBILITY TO MAKE SURE THESE TESTS HAVE BEEN CONDUCTED, AND THAT THE RESULTS ARE ACCEPTABLE PRIOR TO INSTALLING THE FLOOR COVERING. WHEN MOISTURE TESTS ARE CONDUCTED, IT INDICATES THE CONDITIONS ONLY AT THE TIME OF THE TEST.
2. MATERIAL STORAGE AND HANDLING
- Flooring material and adhesive must be acclimated to the installation area for a minimum of 48 hours prior to installation.
- Store cartons of tile or plank products flat and squarely on top of one another. Tile or plank products should be stacked no more than 6 high and allow for air flow around stacks when un‐palletized. Preferably, locate material in the “center” of the installation area (i.e. away from vents, direct sunlight, etc.) Storing cartons in direct sunlight may affect proper acclimation by inducing thermal expansion/contraction.
- When palletizing on a jobsite vinyl plank or tiles need to be stacked 2 rows high side by side with no airspace between. Then quarter turned for 2 rows side by side, not to exceed 12 boxes high. A 5/8” or thicker plywood must also be placed on the pallet first.
- Do not stack pallet’s 2 high unless utilizing a 1” thick plywood in between pallets.
3. SUBSTRATES
Note: All substrates to receive resilient flooring shall be dry, clean, smooth and structurally sound. They shall be free of dust, solvent, paint, wax, oil, grease, residual adhesive, adhesive removers, curing, sealing, hardening/parting compounds, alkaline salts, excessive carbonation/laitance, mold, mildew, and other foreign materials that might prevent the adhesive from bonding.
Crumb rubber underlayments are not an acceptable option for use with resilient floor coverings due to performance issues resulting from chemical incompatibilities.
WOOD SUBSTRATES
Wood subfloors must be structurally sound and in compliance with local building codes.
- Double‐Layered APA rated plywood subfloors should be a minimum 1" total thickness, with at least 18" well ventilated air space beneath.
- Chip board, OSB, particleboard, construction grade plywood are generally not acceptable substrates – add a layer of APA underlayment grade ply wood that is dimensionally stable, non‐staining, with a smooth fully sanded face.
- Underlayment panels can onlycorrect minor deficiencies in the sub‐floor while providing a smooth,sound surface on which to adhere the resilient flooring. Wood subfloors should be flat – 3/16” in 10’ or 1/8” in 6’.
- Insulate and protect crawl spaces with a vapor barrier covering the ground.
- DO NOT install over sleeper construction subfloors or wood subfloors applied directly over concrete.
- Underlayment panels can only correct minor deficiencies in the sub‐floor while providing a smooth, sound surface on which to adhere the resilient flooring.
- Any failures in the performance of the underlayment panel rest with the panel manufacturer and not with Shaw Industries, Inc.
- It is recommended that your chosen APA underlayment grade panels be designed for installation under resilient flooring, and carry a written warranty covering replacement of the entire flooring system.
- SHAW resilient flooring is not recommended directly over fire‐retardant treated plywood or preservative treated plywood.
- The materials used to treat the plywood may cause problems with adhesive bonding. An additional layer of APA rated 1/4" thick underlayment should be installed.
- Always follow the underlayment manufacturer’s installation instructions.
STRIP – PLANK WOOD FLOORING
Due to expansion/contraction of individual boards during seasonal changes, SHAW recommends 1/4" or thicker APA rated underlayment panels be installed over these types of subfloors.
CONCRETE
New or existing concrete subfloors must meet the guidelines of the latest edition of ACI 302 and ASTM F 710, “Standard Practice for Preparing Concrete Floors to Receive Resilient Flooring”.
- On or below‐grade slabs must have an effective vapor retarder directly under the slab.
- Wet curing 7 days is the preferred method for curing new concrete.
- Curing compounds (DO NOT USE). If present they can interfere with the bond of the adhesive to the concrete. Seek assistance from a substrate manufacturer if curing agents are detected.
- Remove curing compounds 28 days after placement, so concrete can begin drying.
- Concrete floors shall be flat and smooth within 1/8" in 6 feet or 3/16” in 10 feet.
- F‐Number System: Overall values of FF 36/ FL 20 may be appropriate for resilient floor coverings.
Note: Perform Bond testing to determine compatibility of adhesive to the substrate. Shaw 9050 primer can be utilized to promote adhesion. Expansion joints in concrete are designed to allow for the expansion and contraction of the concrete. Resilient flooring products should never be installed over expansion joints. Expansion joint covers designed for use with resilient floorings should be used. Control joints (saw cuts) may be patched and covered with resilient once the concrete is thoroughly cured, dry and acclimated.
LIGHTWEIGHT CONCRETE
All recommendations and guarantees as to the suitability and performance of lightweight concrete under resilient flooring are the responsibility of the lightweight concrete manufacturer. The installer of the lightweight product may be required to be authorized or certified by the manufacturer. Correct on‐site mixing ratios and properly functioning pumping equipment are critical. To ensure proper mixture, slump testing is recommended.
- Lightweight aggregate concretes having densities greater than 90 lbs. per cubic foot may be acceptable under resilient flooring.
- Concrete slabs with heavy static and/or dynamic loads should be designed with higher strengths and densities to support such loads.
- Surface must be permanently dry, clean, and smooth, free of all dust, and structurally sound.
- Perform Bond testing to determine compatibility of adhesive to the substrate. Shaw 9050 primer can be utilized to promote adhesion.
Radiant Heating: Radiant-heated subfloor systems can be concrete, wood or a combination of both.
The heating systems components must have a minimum of 1/2" separation from the flooring product. The system must be on and operational for at least 2 weeks prior to installation to reduce residual moisture. Three days prior to installation lower the temperature to 65 degrees (18.3°C), after installation gradually increase the temperature in increments of 5° F to avoid overheating. Maximum operating temperature should never exceed 85°F( 29.4). Use of an in-floor temperature sensor is recommended to avoid overheating. Contact the manufacturer of your radiant heating system for further recommendations.
- Electric Radiant Floors: consist of electric cables (or) mats of electrically conductive materials mounted on the subfloor below the floor covering. Mesh systems are typically embedded in thin-set. When embedding the system components, use cementitious patching and leveling compounds that meet or exceed Shaw’s maximum moisture level and pH requirements. Use of gypsum-based patching and/or leveling compounds which contain Portland or high alumina cement and meet or exceed the compressive strength of 3,000 psi are acceptable.
- Hydronic Radiant Floors: pump heated water from a boiler through tubing laid in a pattern under the flooring. Typically installed in channels under a wooden subfloor (or) imbedded in concrete slabs. Requires the installer follow a specific nailing pattern to avoid penetration of the heat system.
RESILIENT FLOOR COVERING
- Must be single layered, non‐cushion backed, fully adhered, and smooth.
- Show no signs of moisture or alkalinity.
- Waxes, polishes, grease, grime, and oil must be removed.
- Cuts, cracks, gouges, dents and other irregularities in the existing floor covering must be repaired or replaced.
- Embossing leveler recommended to aid in proper bonding and to prevent telegraphing.
- Do not install over rubber based substrates.
NOTE: THE RESPONSIBILITY OF DETERMINING IF THE EXISTING FLOORING IS SUITABLE TO BE INSTALLED OVER TOP OF WITH RESILIENT, RESTS SOLELY WITH INSTALLER/FLOORING CONTRACTOR ON SITE. IF THERE IS ANY DOUBT AS TO SUITABILITY, THE EXISTING FLOORING SHOULD BE REMOVED, OR AN ACCEPTABLE UNDERLAYMENT INSTALLED OVER IT. INSTALLATIONS OVER EXISTING RESILIENT FLOORING MAY BE MORE SUSCEPTIBLE TO INDENTATION.
Quarry Tile, Terrazzo, Ceramic Tile, Poured Floors (Epoxy, Polymeric, Seamless)
- Must be totally cured and well bonded to the concrete.
- Must be free of any residual solvents and petroleum derivatives.
- Waxes, polishes, grease, grime, and oil must be removed.
- Show no signs of moisture or alkalinity.
- Cuts, cracks, gouges, dents, and other irregularities in the existing floor covering must be repaired or replaced.
- Fill any low spots, holes, chips and seams that may telegraph through the new flooring.
- Grind any highly polished or irregular/smooth surfaces. Quarry tile or Ceramic tile grout joints and textured surfaces must be filled with an embossing leveler or substrate manufacturer approved material.
4. SHAW ADHESIVES & PRIMER
Refer to adhesive label for proper trowel requirements, spread rates and application.
Prior to application of adhesive determine if the substrate is a porous or non‐porous substrate. Follow instructions on the adhesive label for porous or non‐porous subfloor.
Adhesives: Shaw 200, Quickflash, S150, InstaGrab (Floorte™ Pro Product with attached EVA pad requires the use of T-180 adhesive)
IMPORTANT: Recommended to perform a bond test in order to determine adhesive working time per job site conditions. The strength of the bond test will indicate whether Shaw 9050 floor primer is necessary.
5.INSTALLING RESILIENT TILE & PLANK PRODUCTS & FLOORTE™ PRO PRODUCTS
General
- Ensure that moisture tests have been conducted and that the results do not exceed the acceptable moisture limit for the adhesive used.
- PH of concrete sub‐floor needs to be between 5&10.
- The permanent HVAC system is turned on and set to a minimum of 65°F (18.3°C) ) or a maximum of 85°F (29.4°C), for a minimum of 72 hours prior to, during and after installation. After the installations, the maximum temperature should not exceed 85°F.
- Do not stack more than 5 cartons high.
- Flooring material and adhesive must be acclimated to the installation area for a minimum of 48 hours prior to installation.
- Use appropriate trowel size regarding substrate porosity
- Material should always be visually inspected prior to installation. Any material installed with visual defects will not be considered a legitimate claim as it pertains to labor cost.
- Install tiles running in same direction.
- Ensure that all recommendations for sub‐floor and jobsite conditions are met prior to beginning the installation. Directional designs are optional, however, once the installation is started, you have accepted those conditions.
- Floorte™ Pro Product with attached EVA pad – These products require the use of Shaw T‐180 adhesive only. Use of non‐approved adhesives may result in adhesive failure.
LAYOUT AND INSTALLATION GENERAL RULES
- Shaw tile and plank ‐ Install using conventional tile and plank installation techniques. Plank products should have a minimum of 6 – 8" seam stagger.
- Carefully determine where to begin tile or plank installation.
- It is customary to center rooms and hallways so borders are not less than half a tile or plank.
- Working out of multiple boxes at a time is recommended.
- In hallways and small spaces, it may be simpler to work lengthwise from one end using a center reference line as a guide.
- Make sure cut edges are always against the wall.
- To properly cut LVT/LVP products score the top side of the material with a utility knife. Bend the product and finish the cut through the backside. This will ensure the cleanest cut. It may be necessary to use a heat gun to cut around vertical obstructions. Allow the heated LVT/LVP to return to room temperature before installation.
- Cutting the product into a fine point may lead to delamination. Use an ethyl cyanoacrylate based super glue to help fuse the LVT/LVP point together. Be sure to clean all glue from the top surface immediately. Alcohol based super glues may cause vinyl to swell.
- For random width plank begin installation with the widest plank first.
NOTE: Recommended to use floor protection after installation. DO NOT use a plastic adhesive based protection system.
INSTALLATION FOR TILE
Layout of the Room for Squarely Laid Fields:
Figure 1
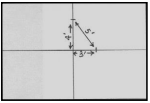
Figure 2
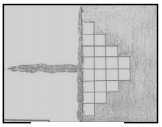
Dry‐lay a row of tiles from the center line to the side wall to determine the space left for the borders. If the resulting border is too small, move the starting point over a half tile width so that it straddles the center line. Repeat the same procedure lengthwise of the room. (This can readily be figured out from the room dimensions without putting down the tiles if desired.)
If it is decided to have the center row of tiles straddle either or both of the center lines, additional guidelines should be snapped on the floor ½ tiles width on one side of either or both center lines as required. (See Figure 2) After the border widths have been determined and the center starting lines have been snapped spread the recommended adhesive on the center lines leaving portions of the lines at center and near each wall uncovered as shown in Figure 3.
IMPORTANT: All flooring must by rolled with a minimum 100‐lb roller after installation. Use a hand roller in areas not reached with a 100‐lb. roller.
VERSAILLES PATTERN TILES
The Versailles Pattern (French pattern). Proper installation and layout is important. The material must have a grout line of 3mm for proper placement. Use of 3 mm spacers is required to achieve proper grout line size and to ensure the tiles are spaced evenly.
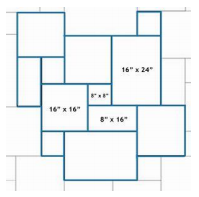
- The pattern is composed of
- 44% 16" x 16" tiles
- 33% 16" x 24" tiles
- 11% 8" x 16" tiles
- 11% 8" x 8" tiles
- Instructions – Use a 3mm spacer to separate the tiles as the pattern is constructed.
- Place one 8‐inch by 8‐inch tile in the center.
- Position two 16‐inch by 16‐inch tiles with one above where the right edge of the larger tile is flush with the right edge of the smaller tile, and one to the left so that the top edge of the second larger tile is flush with the top edge of the smaller tile.
- Place one 8‐inch by 16‐inch tile on the bottom of the section so that the 8‐inch edge presses against the 16‐inch square tile and half of the 16‐inch edge is pressed against the base edge of the square tile.
- Place a 16‐inch by 24‐inch tile in the corner created by the rectangular tile from Step 3 and the square tile from Step 1 so that the 16‐inch edge runs horizontally, extending out to the right of the structure.
- Position a 16‐inch by 16‐inch tile immediately below the 16‐inch by 24‐inch tile so that the left edge of the square tile is pressed against the short edge of the rectangular tile.
- Lay a 16‐inch by 24‐inch tile with the 24‐inch side running horizontally immediately to the left of the tile from and pressed against the base of the rectangular tile and half of the base of the first 16‐inch square tile.
- Place an 8‐inch square tile against the last half of the base of the first 16‐inch tile and against the left edge of the 16‐inch by 24‐inch tile.
- Place an 8‐inch square tile immediately above the first 16‐inch square tile with a 16‐inch square tile right above the 8‐inch tile.
- Position an 8‐inch by 16‐inch tile with the 16‐inch edge pressed against the 8‐inch square tile and the original 16‐inch square tile.
- Position the last tile, an 8‐inch square tile, so that the right edge is flush with the right edge of the top‐right 16‐inch by 24‐inch tile. The 8‐ inch tile must be on top of the large rectangle with the right edges flush to complete the overall design.
6. ARRAY GROUT
Array‐Grout, with a unique formula, offers stain resistance color consistency and a smooth texture for easy spreading and clean‐up.
- For Grouting Shaw groutable tiles. Can also be used on vitreous, semi‐vitreous or absorptive tile including ceramic, mosaic, quarry, cement, porcelain, brick, mini‐brick, precast terrazzo and natural stone.
- Stain resistant, premixed, no shade variance, resists mold and mildew.
- Use on floors, countertops, walls, and ceilings.
- For interior installations only.
COVERAGE
- 1/16“ Grout joint approximately 500 sqft/gallon.
- 1/8“ Grout joint approximately 300 sqft/gallon.
- 1/4“ Grout joint approximately 140 sqft/gallon.
LIMITATIONS
- Shaw Array‐Grout should not be installed, when ambient temperature is below 60° F and above 90° F. Shaw Array‐Grout should be kept at room temperature for 24 hours before installation.
- Some types of glazed ceramic tile, marble and stone can be scratched, stained or damaged when grouted with pigmented or sanded grouts. Generally white grout is best suited for grouting white or light colored marble or granite. Follow tile manufacturer’s recommendations. Test a small area prior to use. Certain tile with high absorption, surface porosity or rough textured surfaces and certain types of porcelain may require sealing prior to grouting to prevent staining.
SURFACE PREPARATION
- Tile must be firmly attached to a sound substrate and setting material must be cured for a minimum of 24‐48 hours before grouting.
- Remove all spacers. Grout joints should be uniform in depth and width and free of all loose debris, contaminants and excess mortar or adhesive.
APPLICATION
New installation
- Before grouting, soak the grout sponge in a pail of clean cool water and thoroughly wring out.
- Use the dampened sponge and lightly wipe the tile surface in an area no larger than 5‐10 sq. ft. A slightly wet tile surface allows the grout to glide easily over the tile and into the grout joint while providing for easier cleanup.
- While tile is still damp, dispense a liberal amount of grout onto the tile surface.
- Using the grout float, press the grout into the grout joints over the dampened area apply grout on no more than 5‐10 sq. ft. at a time to allow for prompt cleaning; delayed cleaning may cause some cracking.
- Place the grout float on edge at a 45° angle and rake the float diagonally across the tile surface while exerting a downward pressure. This will force the grout evenly into the grout joints.
- Immediately remove all excess grout from the tile surface by holding the grout flat at a 90° angle to the tile and drawing it diagonally across the tile.
- Clean by soaking grout sponge in clean cool water. Wring out excess water completely.
- Use dampened sponge in a circular motion to smooth grout joints and clean off any remaining excess grout.
- Continue rinsing of sponge in clean, cool water will aid in cleanup.
- Avoid excess water in grout joints. For final cleaning/haze removal, allow grout to cure for 24 hours. Use a dampened sponge, then soft cloth to polish off residue.
Repair existing grout
- Remove existing old grout with a grout saw 1/8” below the surface of existing tile, Sweep or vacuum dust and debris from surface of tile and grout joints.
- Shaw Array‐Grout can be applied directly over old grout. Apply enough to totally cover the old grout. Follow directions for new installation as shown above.
CLEANUP
Clean tools and hands with cold water before material dries.
CARE & MAINTENANCE
Mold and Mildew can grow on dirt, food, and soap scum that can accumulate on the grout surface. Routine cleaning will limit mold and mildew growth.
SAFETY
Avoid eye contact or prolonged contact with skin. Wash thoroughly after handling. If eye contact occurs, flush with water for 15 minutes and consult a physician.
INSTALLATION FOR VINYL PLANKS
Layout of the Room
- Find the center point of the room. Strike a line.
- Obtain a true 90’ angle by using a carpenter’s square.
- Strike a second line which will divide the room in to four equal parts.
- Measure the distance from the center to the wall, parallel to the direction of the plank.
- Divide the measurement by the width of the plank. If less than half remains as the border plank, adjust the point to compensate. This will give a larger border along the wall and reduce the chance of having to cut a small sliver of flooring to place along the wall.
Layout of the Plank

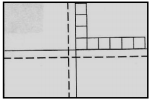
- Carefully place the first piece of plank at the junction of the chalk lines.
- Continue to lay the plank, making sure each plank flush against the chalk line and tight against the adjoining plank.
- Make sure the plank is well seated into the adhesive paying special attention, to the edges. Lay row by row, or in a pyramid fashion as shown below.
Fitting the Border
- Measure the distance from the last plank in the row to the wall.
- Mark the plank and cut it against the mark.
- Lay the plank in place, making sure that the cut edge is against the wall.
Fitting Around Irregular Objects
- Make a pattern out of heavy paper to fit around pipes and other irregularities.
- Place the pattern on the plank, trace cutting along the trace lines.
IMPORTANT: All flooring must by rolled with a minimum 100‐lb roller after installation. Use a hand roller in areas not reached with a 100‐lb. roller.
Note: Do not use tape to secure floor protection during construction or renovation. Use ram board or similar to protect the floor.